Android – Using MX and the Internet Simultaneously
Unlike iOS, the Android Operating System currently does not automatically re-route Internet traffic to your cellular connection. If your Android device has an active cell data subscription, the following instructions walk you through how to setup your Android as a Mobile HotSpot and how to configure OBDLink MX to connect to Mobile HotSpot, so you can connect to your car and the Internet simultaneously.
Depending on your mobile carrier and current plan, you may be able to use the Mobile Hotspot feature for no extra charge. However, this is not always the case so be sure to check with your carrier to see if any additional fees apply for Mobile Hotspot use before using this configuration.
Other options exist that don’t rely on Mobile Hotspot, but they generally require ‘rooting’ your Android device to overcome hardware (or carrier) limitations and running a 3rd party app. Since rooting could void your phone’s warranty, we do not recommend this option.
Step 1: Access OBDLink Configuration Settings
- OBDLink MX Wi-Fi uses SoftAP Mode by factory default. To change the default settings, access MX’s built-in web configuration screen.
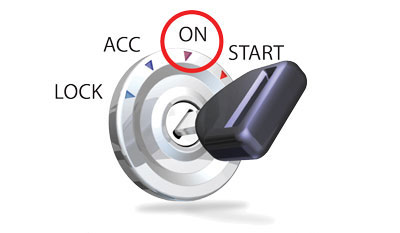
- Plug MX into the OBD port on your vehicle, and turn the key to the ON position.
![]()
- Verify the Green ‘POWER’ LED is on. Press MX’s multi-function button 3 times to activate Web Configuration Mode. The ‘Wi-Fi’ LED will be solid and blink OFF about every 3 seconds. Note: While in Web Configuration mode, MX will not work with the OBDLink app or other software.

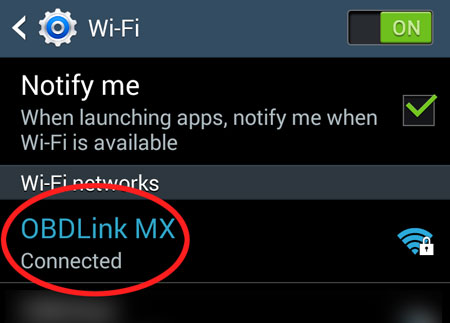
- Open Android’s ‘Settings’ app, and tap ‘Wi-Fi’. Select ‘OBDLink MX’ from available networks.
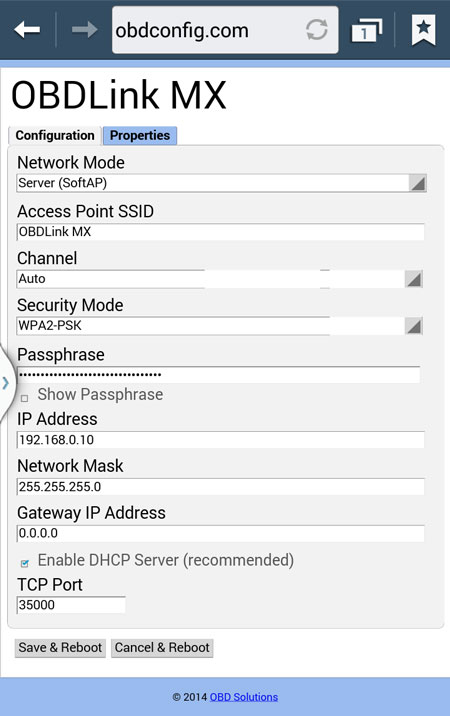
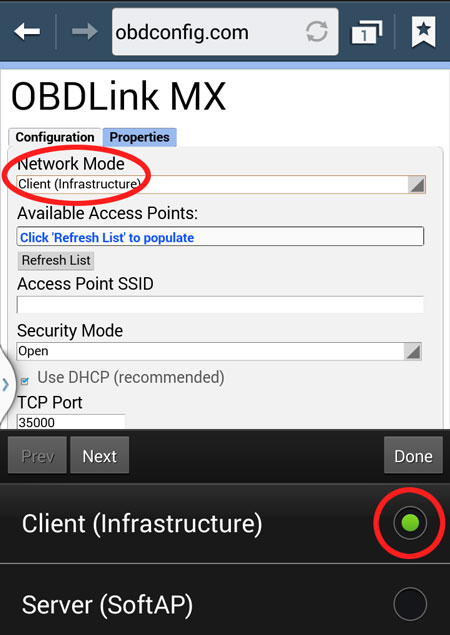
- Open your preferred web browser, and type obdconfig.com in the address bar. MX’s Web Configuration page will appear:
Step 2: Configure MX to connect to a Mobile HotSpot
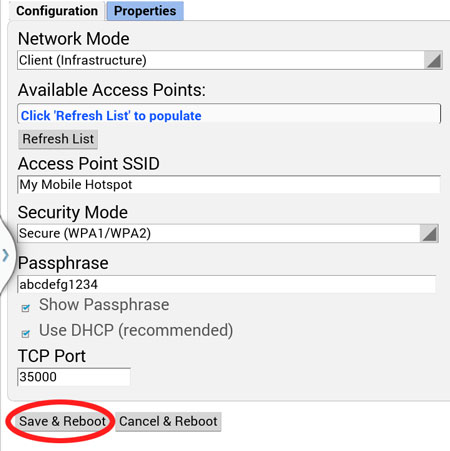
- Tap the box under ‘Network Mode’, select Client (Infrastructure).
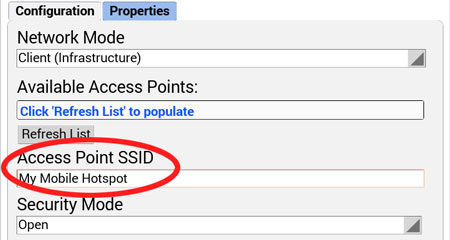
- Create and enter a name for your Mobile HotSpot in the ‘Network SSID’ field. Note: If you have previously configured Mobile HotSpot on your Android device, enter the existing Hotspot name in the ‘Network SSID’ field.
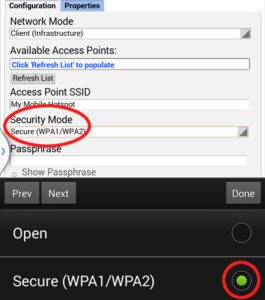
- RECOMMENDED – Change Security Mode from ‘Open’ to ‘Secure (WPA1/WPA2)’, and enter a Passphrase.
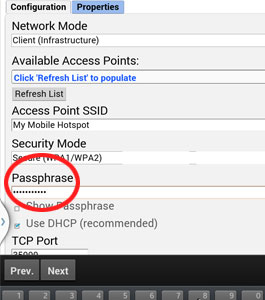
- Write down the Network SSID and Passphrase, which are needed for Step 3. Tap the ‘Save & Reboot’ button.
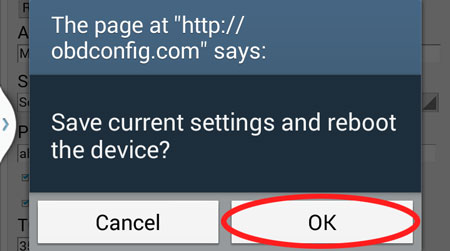
- Tap ‘OK’ when prompted to save settings. The Web Configuration page confirms the configuration settings were saved. MX is now ready to connect to your Android Mobile HotSpot! Note: Wi-Fi connection will be dropped upon Web Configuration reboot. If an Android dialog box pops up stating ‘Connection problem’, tap OK.
Step 3: Configure Android Mobile HotSpot
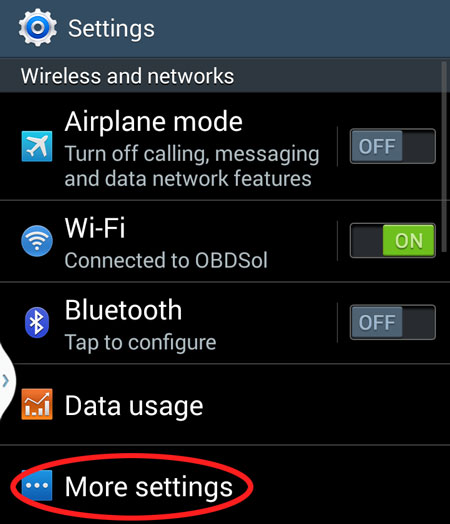
- Open the ‘Settings’ app on your Android device. Note: Location of Mobile HotSpot Settings can vary by phone. A Samsung Galaxy phone was used here, but see below for how to access Mobile HotSpot Settings on other major brands.
LG phones
HTC phones
- Tap ‘More Settings’
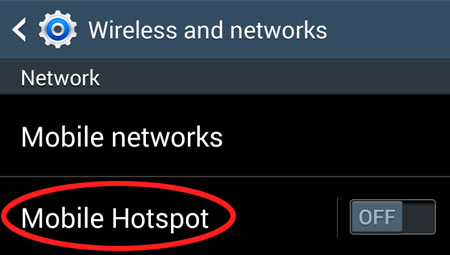
- Tap ‘Mobile Hotspot’
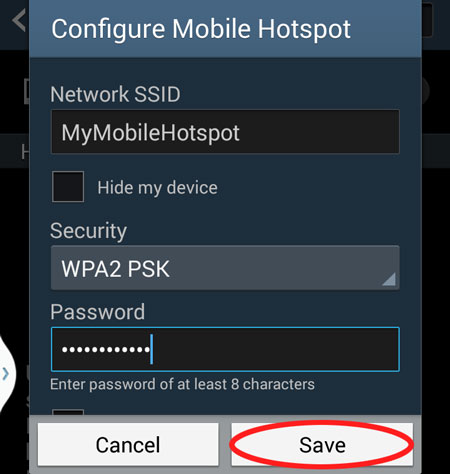
- Tap ‘Configure’

- Change ‘Network SSID’ and ‘Passphrase’ to what you wrote down in Step 2. Tap ‘Save’
- Tap the toggle switch to turn on the Mobile Hotspot. When notified this will turn off Wi-Fi. Tap ‘OK’
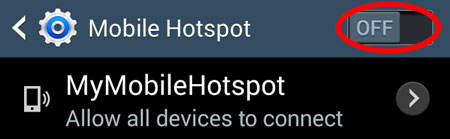
- Android will take a few moments to start the hotspot. The hotspot icon appears in the status bar.
![]()
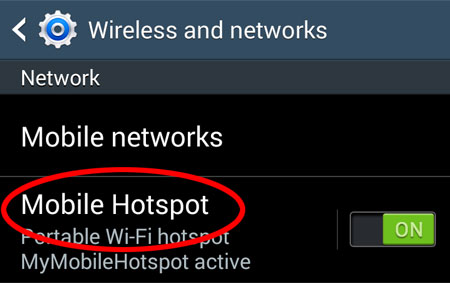
- Tap ‘Mobile HotSpot’ text. Note: A device automatically connected to your Mobile HotSpot. Since we pre-configured MX, this device is most likely MX. (By default, all MX devices have a MAC address starting with “00:06:66”).
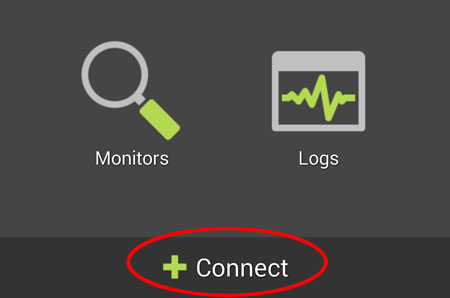
Step 4: Open the OBDLink app and start using it!
- In the Android apps listing, tap ‘OBDLink’ to open.
- On the app Dashboard, click ‘Connect’. The app will show a successful connection at the top of the dashboard screen. You can now use the all functionality included in the OBDLink app, and use your cell data connection for any Internet-related activities. Please verify with your carrier provider if any additional fees apply for Mobile Hotspot use.